On this week’s ORC To-Do list is to paint the Girl’s room light pink and trimming out the window.
Here’s a before pic, the walls are botany beige, which is through out my house. After 9 years, I’m definitely ready for a change.

This post contains some affiliate links for your convenience. Click here to read my full disclosure policy.
Painting Pink – Oh the fun!
I seem to excel at picking out the wrong paint color, or feeling bold until I get the paint, ha ha. I knew I wanted to try a super light pink, kind of like blush. So I took the comforter pillow cover down to Home Depot and matched a pink to the light pink on the comforter. Then I got the lightest color of pink on that card. I wanted to make sure the hue wouldn’t clash with the comforter. Excitedly I took the card to the paint counter and asked for 2 gallons in eggshell. When I came back for the paint, they dabbed a little pink on the tag and I thought to myself, oh boy what have I done!!!
The first coat of pink paint on the wall was a bit too much, think of your Pepto Bismol bottle in your cupboard. Yep that’s what I had on the wall. I knew I would need two coats of paint on the wall, so I was hoping to mute the color with the 2nd coat. I added 2 cups of white paint to the pink gallon, well that hardly made a difference. Now onto the 3rd coat…and maybe losing some patience for painting. I added 1 cup of pink to 2/3rds a gallon of white! Finally, a nice pale pink.
If I get sick of this much pink, I’ll probably add wainscoting to the lower 2/3rds of the wall. I think it turned out nice, it’s not overwhelming at all in real life.

Trimming Windows
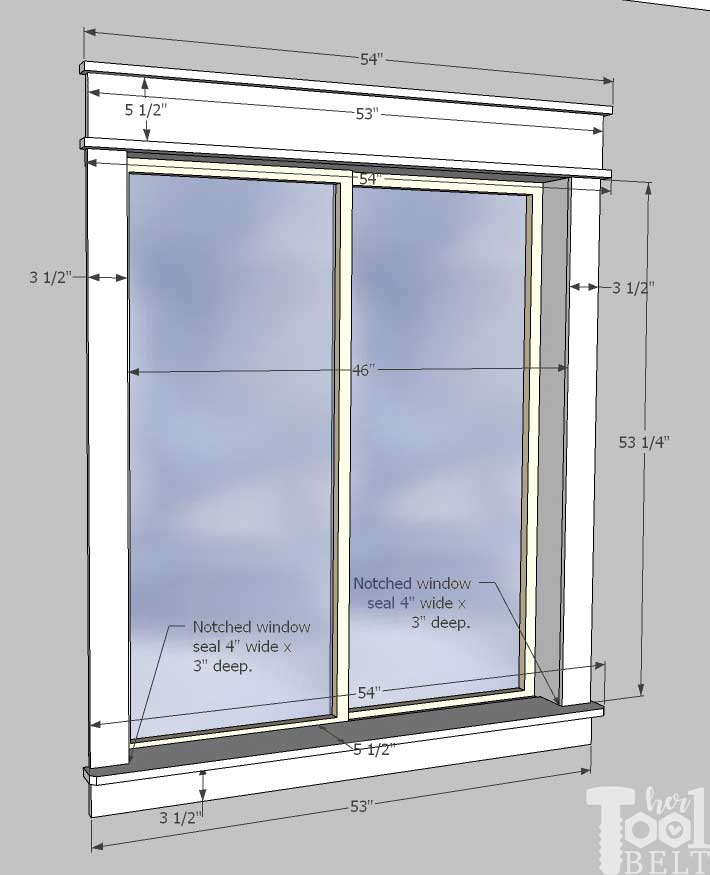
Here is an easy guide for the molding measurements to trim the window.

Materials Needed:
- 3 – 1/2″ x 3 1/2″ x 8′ primed MDF board (side and bottom casing)
- 1 – 3/4″ x 5 1/2″ x 8′ primed MDF molding (window seal)
- 1 – 1″ x 5 1/2″ x 8′ primed MDF header – CRB4PR (from BMC/Stock used to be RB4) or you can use 2 pieces 1×2 molding/board and a 3/4″ x 5 1/2″ primed board, as shown in sketch.
- 2″ brad nails
- spackle
- sanding block
- caulk
- primer
- paint
- wood glue
Tools Used:
- Miter saw
- Brad nailer
- Jig saw or alternate
- Caulk gun
- Paint brush
- Measuring tape
- demo
- utility knife
- hammer
Cut List
- 1 – Window Seal (3/4″ x 5 1/2″) length = Window Width + 2*Case board width + 1″ = 46″ + 2*(3 1/2″) + 1″ = 54″
- Each end of the window seal needs to be notched out.
- Length of notch = Case board width + 1/2″ = 3 1/2″ x 1/2″ = 4″
- Depth of notch is the depth to the window, for mine = 3″
- Each end of the window seal needs to be notched out.
- 1 – Apron (bottom piece) (1/2″ x 3 1/2″) length = Window Width + 2*Case board width = 46″ + 2*(3 1/2″) = 53″
- 2 – Side Case (1/2″ x 3 1/2″ ) length = measure length after window seal and header is attached. (Mine was 53 1/4″)
- Header
- For a single header piece, cut the inside straight edge on a 45 deg miter to be = Window Width + 2*Case board width + 1″ = 46″ + 2*(3 1/2″) + 1″ = 54″
- Cut 45 deg ends to glue onto mitered ends.
- For a pieced header.
- 1 – Header (1/2″ or 3/4″ x 5 1/2″) length = Window Width + 2*Case board width = 46″ + 2*(3 1/2″) = 53″
- 2 – Trim (3/4″ x 1 1/2″) length = Window Width + 2*Case board width + 1″ = 46″ + 2*(3 1/2″) + 1″ = 54″
- For a single header piece, cut the inside straight edge on a 45 deg miter to be = Window Width + 2*Case board width + 1″ = 46″ + 2*(3 1/2″) + 1″ = 54″
I’m a big fan of moldings, they always draw my attention at homes and buildings. I want to add a little more character and style to the bedroom by trimming out the window.
Demo
The original window seal is made out of MDF and has these little rosette’s on the end.

They are cute, but I’m going to do a little more simple modern craftsman. However I’ll use the same door header that is through out my house for the top header window molding.
I also need to fix a piece of molding that holds the attic entrance up. My husband accidentally stepped on it twice climbing in the attic, and I just haven’t put it back up for the second time. 

Cut the Bead of Caulk
Before taking a hammer to the old window seal and moldings, I used a utility knife to cut the bead of caulk all around. This helped reduce unwanted paint pull off when removing the old molding.

Then I used a hammer and small crow bar to remove the old window seal and moldings.
Window Measurements and Cuts
The first measurement we need is the width of the window opening. Mine is about 46″.

The cut list is easy to generate after you know the window width. (Measurements for my window.)
I used a jigsaw to cut the notches out of the end of the window seal, I also cut a little 45 deg miter off the outside corners for safety.

I glued on the little 45 end caps onto the header 45 deg miter ends.

Trimming out the Window
Once I had most of the boards cut, I started attaching them to the window with 2″ brad nails, making sure to nail into studs.
First I attached the window stool/seal in place. Next I centered the apron and nailed it below the stool/seal.

Then I centered and leveled the header molding above the window. I put the header about 1/8″ above the window, leaving a little 1/8″ reveal. With the header and window seal/stool in place, I measured the lengths needed for both side casing, cut and nailed them in place, also leaving a 1/8″ reveal.
Sometimes when I use a brad nail, the MDF can pop up around the nail, I always make sure to sand those down before spackle. Then I apply spackle with a spatula or my finger.

After the spackle dries, I sand everything smooth.

Before painting, I caulked all of the edges and corners. If needed, I smooth the caulk bead with my finger, and wipe any excess with a wet sponge.

When working with MDF, I always make sure to prime the cut edges really well. MDF soaks up paint like nobody’s business if you don’t prime it first. After priming, I painted all of the trim white in semi-gloss.

I think it adds lots of character to the window, it’s really hard to see since I’m trying to take a picture at a window, but it looks great in real life!

The molding at the attic entrance also got fixed and painted. Success!

Week 2 is done!
I’m updating a bedroom to accommodate two little girlies, and joining in the One Room Challenge fun!

The Plan – Girl Bedroom Makeover for 2
Get rid of the princess purple dresser(we found it a new home with her cousin)Paint the walls pale pink– I’m tired of the botany beige that’s throughout my whole house.Trim out the windows and fix moldings- Build 2 beds with under bed storage
- Change out the light fixture
- Make a few signs for the room
- Find coordinating accessories

Now to tackle the beds!
The post Trimming Windows – Girl’s Bedroom Makeover for 2 – ORC Week 2 appeared first on Her Tool Belt.


